Article: Narrow Beam Underwater Snooting by Rob van Twist
Narrow Beam Underwater Snooting
Accurately aiming the narrow beam of light before you start your dive.
By Rob van Twist
Introduction
A snoot is a tube like device that is fitted to the front of a strobe to narrow the beam of light (see Figure 1). Snooting can be used to highlight the essence in a photo by leaving the non-essential part dark, or to reduce the backscatter during low visibility dives. I bought one this year and found out that it is not so straightforward to use it, especially when you narrow down the light beam width to as small as 10mm.

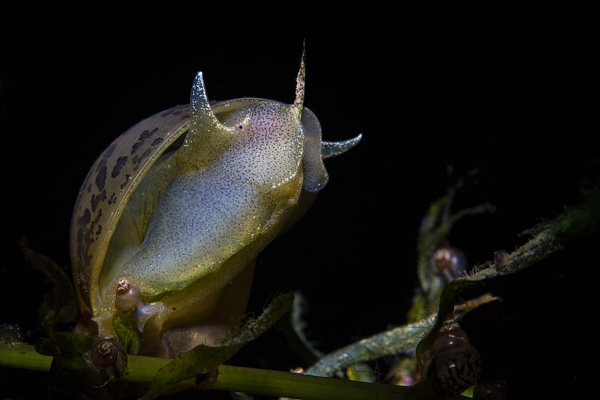
Around the same time I became the proud owner of the awesome “Underwater photography masterclass” book by Alex Mustard (2016). This book inspired me to not give up. Instead it gave me new energy to continue practicing and improving my snooting skills. The macro photo at the front page was taken during a low visibility dive in a small lake near the city of Tilburg in the Netherlands. I used a 1:1 macro lens and a camera-body with a 1,6 crop factor and a snoot with a 10mm aperture. I was really surprised to see how well the snooting technique works for reducing the backscatter.
To get an optimal result, you must aim the narrow beam of light produces by the strobe and snoot accurately such that it hits the intended subject in the center. Sounds logical, but practice learns that it is not that easy. Especially in close macro photography a small inaccuracy will immediately result in a completely dark photo.
The technique below, quoted from the “Underwater photography masterclass” book, was really the turning point for me to get the basics of snooting in place:
(Alex Mustard, 2016) “For this type of image, it is best to use the snooted strobe centrally positioned above the port, aiming down at the subject. … I strongly recommend setting it up once at the start of the dive and trying not to adjust it again. … I will always start my dive looking for a boring stone about the same size as my intended subject. I will switch my AF to thumb focus … and focus. That is the last time I will focus during the dive.”
In close macro photography with a focused down magnification of 1:1 and with a 10mm aperture snoot, this alignment task underwater remains a very accurate job. I know from personal experience that it is doable, but how nice would it be if you could do it before you enter the water and make use of extra tools that we do not have underwater.
However, the optical behavior in water compared to air is different. The effect is that the focal distance increases in water. This difference in focal distance will result in a misalignment underwater between the subject and the narrow beam of light from the snooted strobe (see Figures 2). We need to compensate for this misalignment at the surface. This article will address this misalignment issue. It will start with understanding the theory and then show how it can be used in practice.

The Theory
About Focal Distance and Index of Refraction.
This chapter will address the theory behind calculating the increase in focal distance when we take our camera underwater. Those who want to skip the theory can immediately go to simple formula summarized in the conclusion at the end of this paragraph.
The figures below show the steps that we will follow to explain the theory. Many books address the fundamentals of optics. For this article Jenkins/White (1981) was consulted.

At the surface, without underwater housing
Let’s start with the situation at the surface. The camera is not in the underwater housing yet. (See figure 3 above).
The camera is represented by the lens interface and the image sensor that captures the projected subject. It is like your eye that looks at the subject. The vertical grey dashed line is the imaginary position of the flat port acrylic in your underwater housing. S is the distance from that imaginary flat port acrylic to the subject. When the camera is focussed on the center of the subject the light ray, represented by the dashed blue lines, will travel from the center of the subject and hit the lens interface of the camera. The optics of the camera lens will do its job and project this light ray on the center of the image sensor. The angle between the light ray and the horizontal line at the subjects is α.
So far so good! This is the normal situation when you use your camera at the surface. We now fix the focal distance of the camera, represented by S, and put the camera in our underwater housing.
At the surface, with underwater housing
When we attach the port to the underwater housing an extra optical element is added to our simple optical system, the piece of acrylic at the front of the port. This flat port acrylic has a different so-called Index of Refraction than air. This will change the optical behavior (see Figure 4 above).
The difference in the Index of Refraction will cause the light beam to travel through the acrylic with a different angle as through air. This angle can be calculated by using Snell’s law (also known as the law of refraction):

Where:
R = Index of Refraction of air (= 1 )
sin(α) = the angle of the light beam in air
Ra = Index of Refraction of the port acrylic (= 1,49)
sin(β) = the angle of the light beam in acrylic
The higher Index of Refraction of acrylic (Ra) will result in an increase of the focal distance (Sa). Because of this we must move the subject a little bit away from the lens interface to keep it in focus. This new focal distance (Sa) can be calculated as follows (see Figure 6).

For the triangle with height H and blue dashed hypothenuse holds:

Where:
S = Distance between subject and image when in air and port NOT attached
Ta = Thickness of flat port acrylic
α = The angle of the light beam in air
The 2 adjacent triangles with straight blue hypothenuse (the big triangle in air and the small one in acrylic) have a combined total height H as well. For H holds:

Where:
Sa = Distance between subject and image when in air and port attached
β = The angle of the light beam in flat port acrylic
Combining (2) and (3) gives:

Now we have to do some serious mathematical manipulation of the above equation to factor-out Sa. We need first to get rid of the various tangents.
This is the trick:
- From Snell’s law we can derive sin(β)from sin(α):

- Because we are only interested in the focal distance the height H does not matter.
The focal distance is independent of the height H. More precise, the focal distance should hold for the center point on the subject of size [close to] zero. In that case the angles α and β are also [close to] zero and the sinus will be the same as the tangent for these angles. So:

and substituting this in (4) gives:

Now we can divide both sides by tan(α) and factor-out Sa by doing some standard mathematical manipulation. This finally results in:

With the shift in focal distance being:

In practice, the effect of the refraction by the port acrylic is small. My underwater housing has a flat port acrylic thickness (Ta) of 8 mm which gives a shift of the focal distance of 8.(1-1/1,49) = 2,63 mm.
This is not much and, as we will show in the next paragraph, it will not impact the misalignment formula for underwater. However, one should realize that the shortest focal distance of your lens at the surface (e.g. 300 mm for my camera) will increase with this 2,63 mm when a port is attached with a flat port acrylic of 8mm thickness.
Entering the water
Now the final step, taking the camera underwater. Again we get an extra complexity, the Index of Refraction of water in addition to the one for air and acrylic. This will again change the optical behavior (see Figure 5 above). However, the impact on the shift in focal distance is much bigger than the impact of the port acrylic at the surface.
Now we have to apply Snell’s law for the 3 different media: air, acrylic and water. Figure 7 below shows the details with all the different triangles that we should consider. However, the part that the light beam travels through air and acrylic, and with that the impact on the shift in focal distance, is not different from the situation at the surfaces as described in the previous paragraph. The subject at focal distance Sa from the flat port acrylic represents the situation at the surface with the port connected. As we are only interested in the relation between Sa and Sw we can simply consider the flat port acrylic and the air behind it as part of our newly created “underwater camera” at the surface with the slightly different focal distance.

Lets have a look at the two triangles with angle α and γ. Their height H at the vertical dashed line are similar. So this gives us:

Like in the previous paragraph we apply Snell’s low and replace sinus with tangent (because the angles are close to zero). This gives:

Removing tan(α) from both sides of the equal sign gives:

Where:
Sa = Distance between subject and flat port acrylic when in air and port attached R = Index of Refraction of air (= 1 ) Rw = Index of Refraction of water (= 1,33) Sw = Distance between subject and flat port acrylic when in water
If you replace Rw and R with the actual values 1,33, and 1 we finally get the very simple and handsome formula:

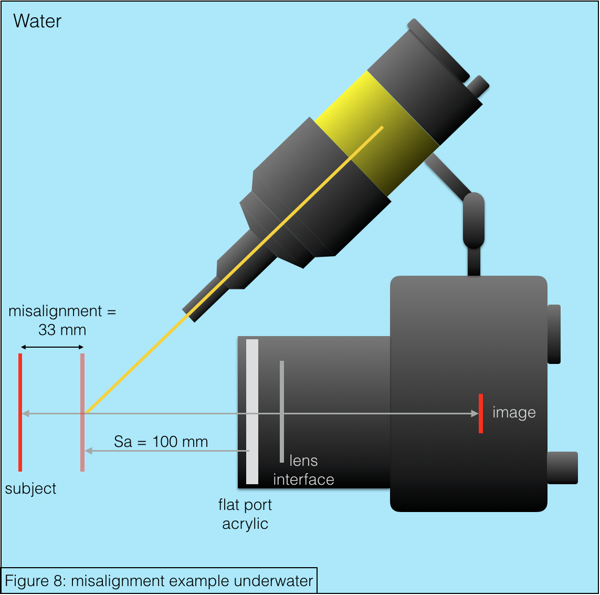
So, if you focus your subject at the surface (with the port attached) at a focal distance of 100mm measured from the front of your flat port acrylic, the focal distance underwater will be 133mm. So, the misalignment will be 33 mm and your snoot should be compensated for that.
Conclusion
When submerging in water the shift in focal distance is substantial. The simple formula to calculate the new focal distance is:

Where:
Sa = Focal distance between subject and flat port acrylic at the surface and port attached
Sw = Focal distance between subject and flat port acrylic when in water
In the example in figure 8 the misalignment is 33 mm. This would definitely mean that your narrow beam of light produced by the strobe and snoot would miss the subject and leave you with a completely dark image. This is also what I experienced when I started with narrow-beam underwater snooting and thought to be clever by preparing the underwater gear before the dive at the surface :-).
Now we know the theory it is time to bring it in practice. The next chapter shows how I did my experiments to “proof” the theory and give some tip and trick to prepare your equipment at the surface.
The photo below was also taken during a low visibility dive in the small lake near the city of Tilburg in the Netherlands. This time I used a 15-85 zoom lens (at 80mm) with the same camera-body with a 1,6 crop factor, and a snoot with a 22mm aperture.

Turning Theory into Practice
Tips and tricks to prepare your equipment at the surface
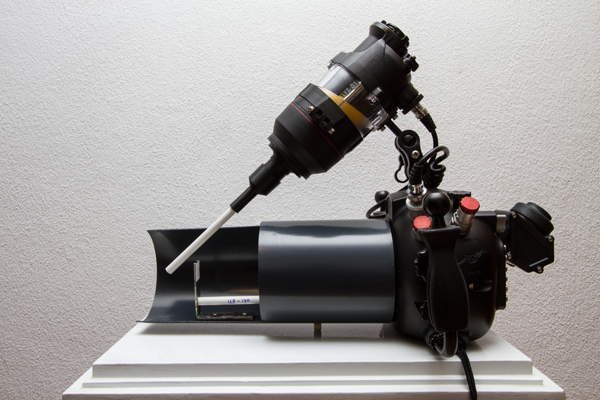
To “proof” the theory addressed in the previous chapter I created a small mobile test setup as shown in the pictures below.

I used standard material that you can by at your local hardware store.
- A big PVC tube to extend the Flat port and create a stable platform for positioning the test-subjects straight in front of the lens.
The test-subjects. They have a 10mm PVC tube attached to it such that they can be accurately positioned with respect to the flat port acrylic. I used 2 sets of test objects to test 2 different focal distances: Sa-Sw = 128mm-170mm and Sa-Sw = 178mm-236mm (see table below). The red cross on the test-subjects is the focus point.
An additional 10mm snoot extension tube “snoot” as a support to position the snoot with respect to the test-subject.
Next to the home-made test setup I used a Canon-7D camera with 2 lenses: a 100mm macro lens and a 15-85mm zoom lens. All safely sealed in a Hugyfot underwater house complemented with a Sea&Sea YS-D1 strobe and a onderwaterhuis.nl Flip Snoot Pro.
I did 3 tests, as listed in the table below, using a small bathtub.
| Test | Lens | Test-subject (Sa-Sw) | S (mm) | Sa (mm) | Sw (mm) | Misalignment (mm) |
|---|---|---|---|---|---|---|
| 1. | Macro 100mm | 128-170 | 125 | 128 | 170 | 42 |
| 2. | Macro 100mm | 178-236 | 175 | 178 | 236 | 58 |
| 3. | EFS 15-85mm: 70mm | 178-236 | 175 | 178 | 236 | 58 |
The steps to setup the equipment
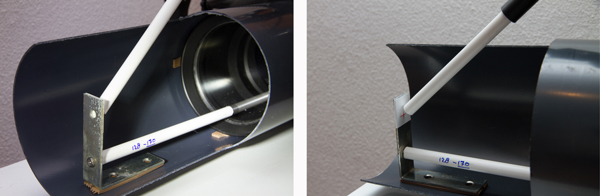
Lets take “test 1” as the concrete case. The first step is to align the snoot with the test- subject. To compensate for the misalignment we get in water (42 mm) we need the 128-170 Sw-test-subject with a focal distance under water of 170mm (Sw). The test setup will look like in the picture below.

Be sure that the Sw-test-subject is accurately positioned in front of the flat port acrylic (see left picture below). The snoot should be carefully adjusted such that the snoot extender exactly point at the red cross; the focus point of the camera (see right picture below).
To check if the alignment is correct you can simple focus your camera on the red cross, take a picture with the strobe switched on, and check if the Sw-test-subject is correctly illuminated.
The second step is to focus the camera using the 128-170 Sa-test-subject as indicated in the picture below. The Sa-test-subject has a focal distance of 128 mm (Sa) measured from the flat port acrylic. This is the focal distance that we will use for all our pictures underwater.
Do not forget to switch AF (Auto Focus) to thumb focus to ensure that the camera will not re-focus when taking the picture.
Thats it, remove the snoot extender and we are ready to make the test picture underwater.
Conclusion
Using the simple mobile test setup described in the previous paragraph all 3 test were executed successfully. The beauty of this approach is that the simple formula shows us that calculating the focal distance in water (Sw) is only dependent on the focal distance at the surface (Sa). So it does not dependent on the type of camera, lenses or underwater housing you use. It always works perfectly! The only thing you should not forget while preparing your camera at the surface is to put it in your underwater housing first and then focus it on a Sa-test-subject with the intended focal distance. This will create the correct Sa that you need to calculate the Sw on which you have to align your snooted strobe.
For me this approach works great. Before every “narrow beam snoot dive” I use the test setup to prepare my equipment. The big PVC tube is a bit unhandy when you travel by airplane. No worries, in that case you leave it at home and look for something at your destination to replace it. You just need a stable platform on which you can put your test- subjects.
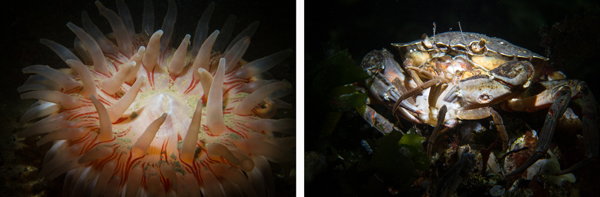
The pictures below where taken during a low-visibility dive in the Grevelingenmeer in the Netherlands. I used a 1:1 macro lens and a camera-body with a 1,6 crop factor and a snoot with a 10mm aperture. The focal distance at the surface was set to 128mm (Sa) which resulted in a focal distance in water of 170mm (Sw). The snooted strobe was align such that it matched with the 170mm focal distance in water.

This snooting technique, where you keep your focal distance fixed during the dive, has a big additional advantage. Once you have set your strobe to produce the correct light output you do not need to change it anymore. All subjects will be illuminated correctly! This is simply because the distance between strobe and subject is always the same. Sw is the same for all pictures you take!
Acknowledgements
Many thanks go to Rene Duijve who helped me in getting the theory part simple and sound. During our daily biking trips to and from office we had lengthy discussions on how to simply the original approach I had taken. The breakthrough came when Rene convinced me not to reason from the original camera optics point of view but to consider the combining of the camera with the underwater housing flat port acrylic as the new camera with its slightly adjusted optical behavior.
In combination with the book “Fundamentals of Optics”, recommended by Rene, I simplified my first attempt which resulted in “ The Theory” chapter.
Bibliography
UNDERWATER PHOTOGRAPHY MASTERCLASS Alex Mustard
First published 2016 by Ammonite Press
ISBN 978 1 78145 222 6
Fundamentals of Optics
Francis A. Jenkins and Harvey E. White
1981, McGraw-Hill Book Co
Chapter 2.12 “Images formed by paraxial rays” ISBN 0-07-032330-5
About the Author:
In his spare time Rob van Twist is a passionate scuba diver and underwater photographer and co-owner of dive4fun.nl. Most dives he made in the “cold and dark” lakes in the Netherlands and Belgium. Since 2009 Rob made many dive trips to his favorite diving place at the Red Sea in Egypt; Red Sea Diving Safari at Marsha Shagra. The last couple of years his focus is on further improving the underwater photography skills by experimenting various techniques like snooting.
If you want more information about his snoot experiments, please email him.