Review: Reikan FoCal Pro AF calibration software
The advent of super high resolution cameras has forced people to re examine their lenses, both in terms of performance and compatibility. It is a little known fact that most cameras and lenses are all very subtly different, even within the same model, and so will behave (again subtly) differently on different bodies. One area that this is perhaps most noticeable in, is the autofocus accuracy.
Most SLR cameras offer the option of fine tuning the autofocus accuracy somewhere in the menu system. The problem typically is how to go about finding what increment to dial in. The increments normally take the form of + or - adjustments, on a scale of 20 units either side of 0 or neutral (+20 to -20).
Reikan offer a software based solution to autofocus calibration called FoCal. This uses control software to take control of the camera and shoot a series of images of a calibration target at different AF fine tuning increments while tethered to a computer. The software then analyses the images and “chooses” the setting that gives the best results.
Purchase and Installation:
Reikan offer three versions of the program, Standard, Plus and Pro. The latter two offer an automatic option, with the Pro version offering additional test options and more control of the testing process. Each is supplied with high resolution pdf and png targets that can be printed off for the tests.
Purchase is via download, and if the software is to be used on a Mac, also requires the download and installation of the Mono framework in order to function. It should be noted that it is available in both Windows and Mac versions. Once installed, it prompts for activation via a key that is supplied via email.
Once installed and activated, the user need to specify whether it will be used with Nikon or Canon cameras via the preferences. I believe that this can be changed at a later date if required. The software currently only supports Nikon or Canon cameras.
The testing
Once installed, the target can be printed off and installed on a convenient surface. The instructions supplied with the software give a good idea of suitable locations. The camera and its lens need to be installed on a tripod (although a bean bag or alternative would suffice at a pinch) and plugged into the computer that has the program loaded via USB. The camera’s eyepiece must be covered/closed and any lens or camera stabilization needs to be disengaged.

When it is plugged in, a licensing screen will pop up, which required you to license each camera that is used with the it. There is a limit to the number of cameras that can be registered, in order to prevent unauthorized commercial use, although I gather that if you reach the limit, you can request for it to be lifted by Reikan.
Once it is all set up, the user is presented with a window asking him or her to “find and connect” with the camera. Once it locates the camera, it then presents a range of testing options, depending on which version is installed.
On the Pro version, these are:
- Target Setup Utility.
- Fully Automatic AF Microadjustment Calibration.
- Semi-Automatic AF Microadjustment Calibration.
- Autofocus Consistency Test.
- Aperture Sharpness Test.
* Dust Analysis Test. - Quick AF Microadjustment Calibration.
- MultiPoint Focus Test.
- Manual Mode.
- AFMA Change Tool.
- Camera Settings.
Target Setup Utility
The first task is to use the Target Setup utility to check that it will work effectively with the test. The utility displays the camera’s LiveView image, and adds “Target search” that identifies and lets the user know that the target is correctly positioned relative to the camera. If it is in an incorrect position, it uses arrows to suggest the movement direction to correct this. A green “tick” mark signifies that the target is in the correct place.
I found that the process was simple and intuitive, although, particularly with long lenses, the recommended A4/US Letter size printed target was too small in the LiveView display to work. Printing it at a larger size cured this however. You do need to be prepared to move the camera and tripod to accommodate different focal lengths, although for underwater use, with mostly wide-angle or macro lenses this is perhaps less of a problem.
Testing lenses
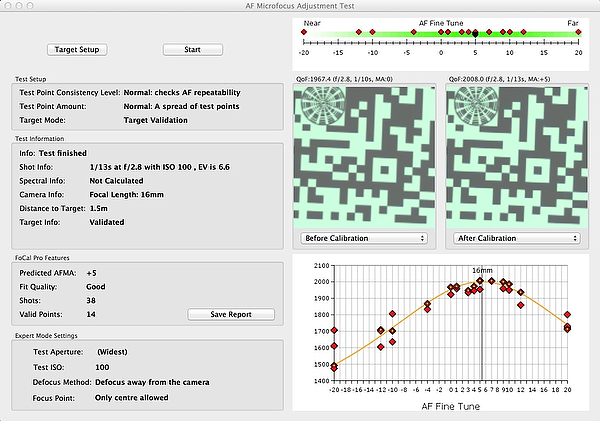
I ran the test in “Fully Automatic AF Microadjustment Calibration” mode. This measures the horizontal and vertical sharpness in all 3 color channels in RAW images produced by the camera. The values are combined with a reading of the total amount of light that is falling onto the target, so that if there is a color shift due to the type of light that is present during the test, this does not skew the results. FoCal does not display the RGB results by default, but can do so by accessing controls if required.
The test itself consists of the program shooting a series of images at different AF micro focus adjustments, seeking the level that gives the sharpest image. As I was using the Pro Version, it graphs each set point and creates a curve representing the AF performance. If it gets an erroneous result, the user can click on this result to remove it from the test.
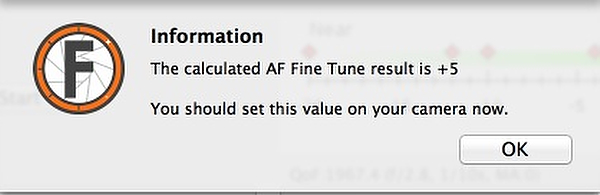
The camera I was calibrating (Nikon D810) will not allow the AF Micro focus adjustment to be controlled via software, so the program prompted for me to manually adjust it as required. Once the camera has taken a series of images at various setting, the tests generally came up with a + or - adjustment that it recommend as being appropriate for the camera/lens combination. These can be stored in the camera, and will automatically become default settings when the lens is used. On a couple of occasions, the software found that it was not getting consistent results and hence prompted for additional settings to be tested. This was entirely automatic!
Each lens took around 5-6 minutes to test, with the Sigma 15mm f2.8 (with my D810) requiring the largest amount of adjustment at +6. It should be noted that this does not imply that the lens (or camera) are in any way faulty, simply that the combination requires this setting in order to offset minute manufacturing tolerance differences.
With all typical underwater lenses (macro and wide-angle), the software worked very well in auto mode. I also used it to calibrate some land lenses, including a Nikkor 70-200 f2.8. Possibly due to a combination of the testing environments and the lens itself, this proved harder to get a reliable result.
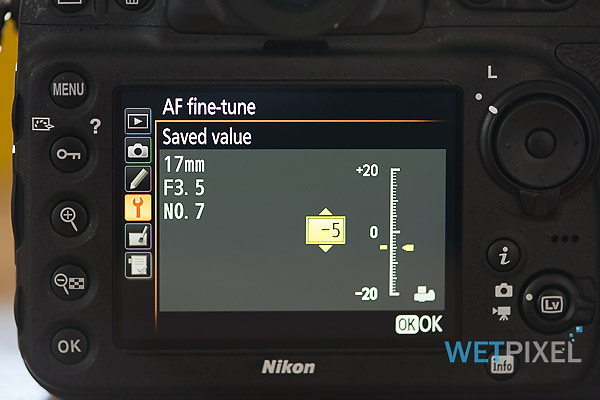
One nice feature with the software is that it automatically stores the AF correction with the lens profile in the camera. This means that when the lens is changed, the camera recognizes this and adds the correct adjustment automatically. I have only tested Nikon cameras, and do not know if this extends to Canon cameras too, but would imagine that it does.
As can be seen above, the Pro version has lots of other functions, however, for most people the lans calibration is probably the primary and most important tool.
Conclusion
High resolution cameras will really show when a lens is not performing correctly. It will also show if a lens is not calibrated,. If you are shooting any camera with 20+ megapixels, it is likely that lens calibration will improve your images.
The software is simple and quick to use and seems to provide reliable results. It has built in functionality that ensures that the targets is set up correctly .The fact that it is software based, will run on a laptop and has no additional parts makes it suitable for using in the field if required.
FoCal currently only supports Nikon and Canon cameras, however their “eventual aim is to support as many cameras as possible… as long as the necessary features are available in the manufacturers Software Development Kits.
Most of the work in creating FoCal has been related to the image analysis and prediction algorithm, which is independent of the camera.”
If you shoot a Nikon or a Canon SLR camera with high resolution, this software is highly recommended.
FoCal is available to purchase via the Reikan site. Via download, the program is priced at £19.95 for the Standard version, £39.95 for FoCal Plus and £69.95 for FoCal Pro.
FTTC statement
The reviewer purchased the review software.