Adding USB Connectivity to your U/W Housing
Note: An updated version of this article is now available.
It took only a couple liveaboard trips to convince me that there had to be an easier solution to downloading photos from the camera. Opening the housing after each dive, and either swapping out the memory card, or plugging in a USB cable to the side of the camera, was not only an inconvenience, but exposed the housing to an increased chance that a small hair or other contaminant might land on the main o-ring, leading to a flood. With the long battery life of the majority of dSLR cameras, the size of the memory card becomes the limiting factor, and with RAW files on some cameras breaking 15mb, one can only shoot so many pictures before the card fills up. Determined, I set about trying to find a way to transfer files over USB through the housing.
A little research on USB, and I found two important qualities. The first is that USB is only four pin. An immediate solution should come to mind – Ikelite-style sync cords are five pin (Source (http://www.accesscomms.com.au/usb.htm):
Standard Type A

Standard USB Socket
Pin 1 +5V Red
Pin 2 -Data White
Pin 3 +Data Green
Pin 4 GND Black
Mini Type B
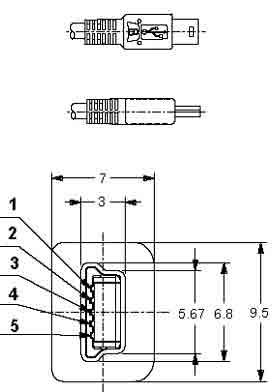
Mini-USB Socket
Pin 1 +5V Red
Pin 2 -Data White
Pin 3 +Data Green
Pin 4 Unconnected
Pin 5 GND Black
The second is that the cable is shielded – this presented some minor issues later in the process. Regardless, I contacted Ikelite about having another sync-cord bulkhead installed (in addition to having my previous sync-cord bulkhead converted to the newly released right-angle bulkhead). Below is an indication of the changes:
Before:
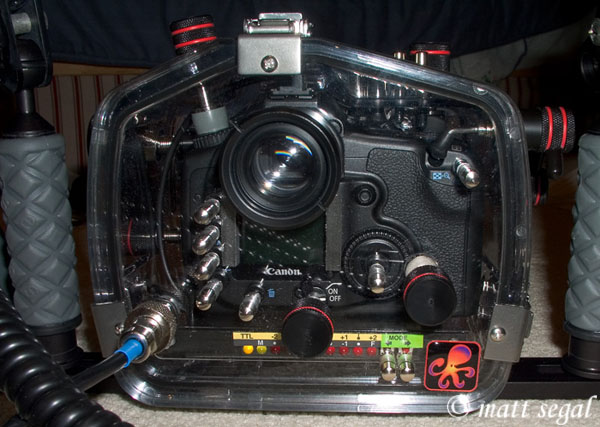
After:
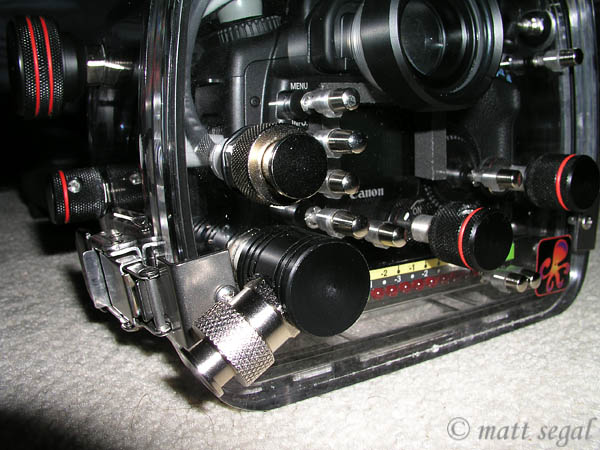
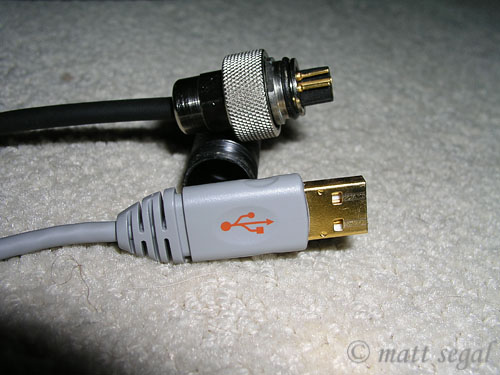
The top bulkhead is what I was concerned with. On the inside of the housing, Ikelite conveniently left me approximately 6” of wire, with the five leads stripped at the end. I promptly cut a USB2 rated cable in half. Note that this is a cable with a Standard Type A connector on one end, and a Mini Type B on the other end (as pictured above), and can be found both online and at most local computer and electronics stores.
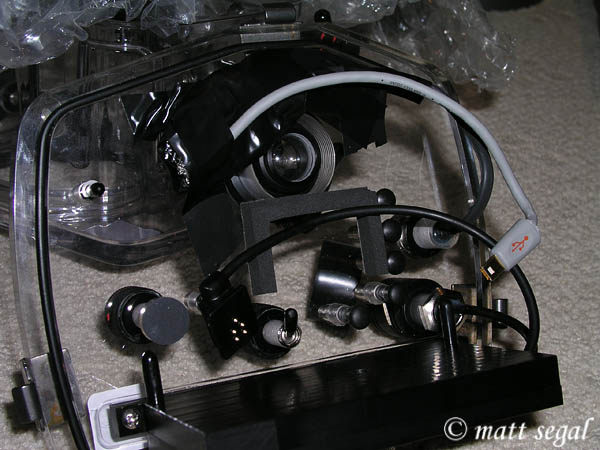
In addition to the modified housing, Ikelite included in the box (at my request), their ICS Plug (#9014.15), along with the pins and receptacles for the rubber grommet they fit into. After vigorous checking with a multimeter, I soldered one end of the cut USB cable to the pins and receptacles, and assembled the plug connection. The bastard child of a USB cable and sync-cord was born:
It should be noted that there were no issues with cutting away the shielding with the previous step, and the cable worked as planned. Attaching the USB mini-plug inside the housing was not as cut-and-dry. Of primary concern was the issue of space, and lack of it. Ikelite has made great strides in reducing the size of the dSLR housings, and this required some creative wiring. In addition, the plastic mold on the plug itself jutted out too far, and would not clear the side of the housing when plugged into the camera, so this was trimmed down until everything fit, albeit snugly.
When wiring up the USB mini-plug to the pre-exposed leads connected to the bulkhead, and testing by plugging into the computer along the way, it was noted that some positioning of the wires led to “USB Device Not Recognized” and “USB Device Not Responding” errors. While I have a feeling that these errors are related to the shielding, or lack thereof, the exact cause behind the problem remains unresolved while I attempt to talk to a few EE’s (and I certainly am open to contact).
I was able to work out a solution by wrapping each of the exposed wires in aluminum foil, and then isolating each from the other through electrical tape, The +5V and GND wires were then slightly separated from the +/- DATA wires through the use of plastic spacers; in my case, I used 1/4” heat shrink tubing. This arrangement seemed to produce the most reliable operation. The entire assembly was again wrapped in electrical tape, and taped above and over the eyepiece. Testing showed that this did not impede any of the camera button functions nor viewing ability. Future improvements will focus on minimizing the amount of wiring.
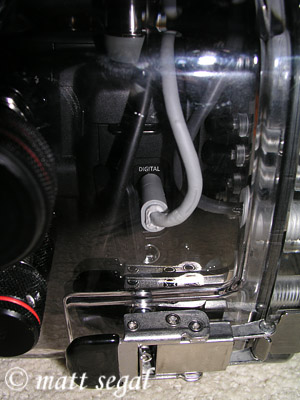
With the camera installed, both the eTTL2 connector and USB connector can be plugged in before the housing is sealed. Here, the USB connector is seen plugged into the side of the camera:
I have not yet run any technical tests on the speed of the transfer, or if it suffered at all due to the cutting of the cable and possible minor signal loss that can occur with any such procedure. However, in casual testing, all RAW files are transferred off the camera at a rate similar to that of the camera outside of the housing (a direct connection). In addition, the Canon Capture program works as well, allowing for USB control of the camera remotely, opening up capabilities for “polecam” use and underwater time-lapse photography. Obviously, steps would need to be taken that the external connector cord is made waterproof (or retrofitted to a waterproof sync-cord).
I am happy to conclude that the idea of being able to download straight from the housing was not only feasible, but fully achievable. There is still lots of room for streamlining the finished product, but I’m content to simply enjoy the functionality for the time being.
Author Bio:
Matt Segal, a Southern California native and resident, learned to dive in the Cayman Islands after a knee injury at age 15. Since then, he has traveled to locations as far as Papua New Guinea and the Solomon Islands as well as the local destinations of the Channel Islands. Segal began underwater photography (and photography in general) in late 2003, and has pursued it since. He currently shoots a Canon 20D in an Ikelite housing, with two Ikelite DS-125 strobes. Segal is a National Merit Scholar and is majoring in Aerospace Engineering at the University of Southern California on a full scholarship.