National Association of Broadcasters Show 2007

I spent a day or two last week at the National Association of Broadcasters Show (NAB) in Las Vegas. This is a big show with every serious company engaged in broadcast and post production in attendance. Since my time was limited, I focused on the latest product announcements from Sony and Apple.

Sony XDCAM EX
Prototypes of the XDCAM EX where on display in the Sony booth at NAB. Very little new information was available about the cam since no functioning version was presented. As such, I learned all I could through discussion with Sony reps and by studying the cam behind glass.
The EDCAM EX is very close in size to he Z1, but wider to accommodate the data storage cards. It promises to capture video at 1080i, 1080p and 720p in variable frame rates. The cam has dual card slots, with 16 gig cards due out later this year. There was talk about 32 gig cards following soon thereafter. The 3 ½ inch CCDs offer an improvement over the Z1s 1/3rd inch CCDs. The cam is also touted to be sparing on battery life.
Sony has chosen MPEG 2 Long GOP (group of pictures) compression technology with transfer rates ranging from 35 Mbps (HQ) to 18 Mbps (LP). This is effectively the same CODEC used in the HDV cams with the addition of an extended bit rate range and a new VBR (variable bit rate) control algorithm. This should result in increased encoding efficiency and improved picture quality. Sony claims that the combination of quality optics and improved compression technology make the XDCAM EX suitable for most broadcast uses.
Sony estimates the price will be below USD 10K and likely around USD 8K. In addition, the price memory cards should be significantly lower than the P2 cards but no official price was offered.
Another item of interest was my discussion regarding the next version of the Z1. From what I can gather form the Sony reps, there does not seem to be any rush to upgrade the Z1 and no product is immediately pending. Several folks hinted that the XDCAM Ex could be the upgrade. This could suggest that Sony may be moving the higher end prosumers from HDV to XDCAM, leaving the V1 and other medium to small format cams to serve the HDV customers. This is just speculation of course. Read the White Paper on XDCAM format (PDF).

Apple Final Cut Studio 2
Apple has made an aggressive move in the desktop post production market. The announcement of Final Cut Studio 2 (FCS 2) with many powerful additions is turning heads in the industry. Apple has made it clear that this market is important one that Apple intends to invest heavily in.
I was fortunate enough to spend time with the lead engineers and designers on ProRes 422, Color, Motion and Compressor. This afforded me the opportunity to ask a lot of questions and dig into some of the technical nuances of the products. Below are some highlights from my discussions.
ProRes 422
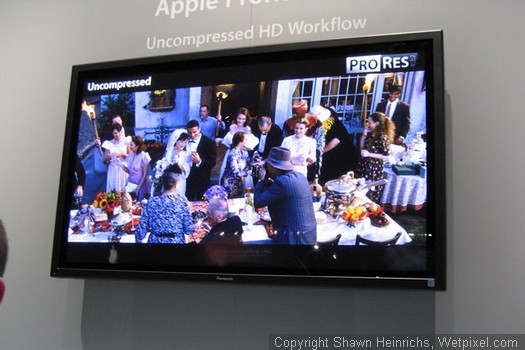
Included with FCS 2 is an impressive and powerful new intermediary codec for editing HD content. ProRes 422 promises to deliver near the quality of uncompressed HD video at 1/6th the size. As the name suggests, the ProRes codec delivers 4:2:2 chroma sampling. Users can select from two version of the codec, ProRes422 HQ with a 220Mbps bit rate or the ProRes422 with a 145Mbps bit rate. Both the HQ and standard versions of the codec use virtually the same compression algorithms, with the bit rate being the primary difference. The codec is so efficient that it can even be played back in Final Cut Pro in RT mode on a MacBook Pro.
In a side by side test, the results were impressive. On the huge theater screen, Apple projected two halves of a single video with the left side being uncompressed the right encoded in ProRes 422HQ. To up the ante, the ProRes 442 side was re-encoded 10 times. The seam was invisible between the halves and any difference in quality virtually indistinguishable. The video included fast motion and many bright colors, characteristics that tend to cause artifacts when compressed. In this case, no artifacts were evident.
Sony, Panasonic and Red are/will all be supporting ProRes 422. This is good sign for the future. I expect that most serious editors, who have neither the computing power nor wallet to edit in uncompressed video, will rapidly adopt ProRes 422.
Read the White Paper (PDF).

Final Cut Pro 6
There are many new features in Final Cut Pro 6, all of which you can learn more about on Apple’s website. Below I have provided a summary of key new features, along with deeper insights that I learned directly from the lead Apple product engineers and designers.
Native support of ProRes422 – Apple Intermediary Codec (AIC) was initially designed to enable iMovie to handle editing of High Def content. With its quality benefits over HDV, FCP users also adopted it. Apple never really intended AIC to be a professional intermediary codec but let it stand as a stop gap. As such, very little was done to further its integration with FCP. With the release of ProRes422, FCP users now have a very high quality, low loss intermediary codec to work with.
Open format timeline – This is perhaps the most exciting addition to FCP. Users can now edit any supported video format in the same timeline without rendering into the timeline format. Sequences auto-conform to the first clip dragged into them. One can mix codecs, frame sizes and frame rates without rendering. In an example, I was shown a sequence with clips from ProRes 422, Uncompressed 10bit, P2, DVCProHD 60p, DV NTSC and DV PAL. All formats auto scale (no stretching) to fit the timeline. The software natively supports P2, allowing users to select In/Out points on the card before capturing to the hard drive.
Stabilize & smooth cam – Apple has integrated stabilization features from Shake into FCP. As before, the software analyzes any clip that one wants to be stabilized. One can select either ‘stabilize’ and lock the cam on a fixed point or choose ‘smooth’ and allow natural motion as the camera pans. X, Y and roll compensation can be manually adjusted. Stabilize is a very powerful feature and welcome addition inside FCP. There are some important limitations however. Analyzing a clip can take a very long time depending on the power of your computer. This is compounded by the fact that one must analyze the entire clip and not just the In/Out points. This means if you selected 1 min to stabilize from a 30 minute clip, you would need to analyze the entire 30 minutes. The work-around is to re-encode the selected clip range between the in/out points as a new Master Clip.
Editable Motion Templates – As with prior versions, FCP supports native Motion files in the timeline. I the past, any changes to that Motion file would need to be sent back to Motion for editing. Now, Motion allows you to export as a template. When this template is imported into your FCP timeline, you can alter the text and properties right in FCP. This can save lots of time.

Motion 3
Of all the FCS applications, Motion has undergone the biggest transformation. The list of new features is long, but here are some highlights.
3D environment – By just adding a camera to your scene, one immediately transforms Motion into a 3D application. Users can toggle between camera view and perspective view. An optional ground plain provides reference. Objects can be moved in 3D space, scaled and otherwise adjusted either directly in the scene or via an intuitive HUD. From a graphics design standpoint, 3D has never been easier. However, true 3D artists may be disappointed. Motion 3 does not support any 3D objects. It is a 3D environment with 2D objects. That being said, certain particle effects can be generated in 3D. I would expect support for 3D objects in future versions.
Photoshop layers – Motion 3 now natively supports Photoshop layers. Just drag and drop into motion and all layers are preserved.
Final Cut Pro templates – Users can now build templates in Motion that can be edited directly in FCP. Only text and various attributes can be modified however.
Motion tracking – Users can now analyze a video, auto detect track points, attach text or an object and have it auto track the moving point in the video. This is an incredibly difficult task made easy.
Stabilization & smooth cam – Motion also supports the same stabilization feature now provided in FCP (see above).
Compressor 3
Compressor received some nice upgrades in version 3. Much of the upgrade focused on better and more repeatable workflow. Most exciting was the ‘job chaining’ ability. Most notable upgrades included:
Improved workflow – A more intuitive and powerful UI and workflow enables users to setup up sophisticated batch processes. Job chaining now allows one to designate the output of one process as the input of then next. This is very powerful for users who need to do expensive operations on the source file then create many sub files. Example would be conversion from NTSC to PAL using high quality optical flow, followed by various delivery sizes. Users would chain the source file (with NTSC – PAL conversion) to the sub files in a single batch. This batch operation can then be saved. Later you can open the batch and replace the video files.
Dynamic Filters – One can now add animated Motion watermarks or logos, create fade in/outs or include time codes.
New delivery formats – Included among the delivery formats and defaults are Apple TV, BlueRay and HD-DVD.
Qmaster Cluster – For those who spent the money on Quadcore and Octocore machines, the new Qmaster enables one to control each processor/core and turn a single Mac Pro into a mini rendering farm.
Episode Pro Plug-in – Compressor 3 now includes a the ability to load Episode Pro as a direct plug in, whereby all the Episode export formats/set ups automatically appear in your options list. Episode Pro includes export formats such as Flash 8, GXF and IMX.
Soundtrack Pro 2
I only briefly stopped by the Soundtrack Pro 2 station. Some of the features that caught my attention included:
Multi-take editor – The feature enables users to mix audio from multiple sound takes to get exactly what they need. A composite window is automatically opened based on track selected. Users can then group multiple tracks in the sound file browser in the composite window. Each of these alternate tracks can be split and added to the composite window which ‘auto composites’ into a single track. This composite track then appears as a single track in the main track editor. At any time the track can be edited by re-opening the group of composite tracks in the composite window.
3 point video HUD – This powerful control enables users to rapidly create 5.1 surround files by adjusting audio channels using a visual, drag/drop HUD.
DVD Studio Pro 4
Very little new has been added to DVD Studio Pro. Perhaps the biggest disappointment is the lack of support for Blue-Ray. This may reflect the fact that Apple has yet to include Blue-Ray devices in their hardware. As such, I didn’t spend anytime with this product.

Color
Color is the latest addition to the FCS suite of applications. It is also perhaps the most exciting addition for those interested in professional grade color correction. Originating from a product called Final Touch before being integrated into FCS, this is a serious applicatoin that produces professional results. I spoke with a veteran DaVinci (six figure color grading solution) user who had spent the last year using Final Touch. In his opinion the Final Touch (now Color) was just as powerful and offered more features than the very expensive DaVinci systems.
Color operates at up 4:4:4 chromo sampling with 32-bit floating processing. Regardless of the format you import (HDV, HDCAM, etc) color opens the video in 4:4:4 resolutions to allow maximum quality color correction. Below are some key features of Color:
Integration with FCP – Users can send sequences directly to Color from within FCP, make the color adjustments and send back to the FCP project. It is important to understand the nuances of this process. One can only send entire sequences (not clips) to Color. FCP then exports XML data which includes a reference to the source videos or “Master Clips” that are included in the sequence. Said another way, regardless of your sequence settings, it is the master clip formats that are referenced in Color.
The XML data then tells color what effects, trims and other operations you performed on the source videos. The user then performs Primary, Secondary and Final corrections in Color. One then renders the sequence which could take awhile depending on the amount of filters and correction applied. On a 4 core Mac Pro with ATI x1900 graphics card, a minimally corrected clip took between 2 to 4 times the real-time duration of the clip (e.g. a 1 minute clip took between 2 – 4 minutes). Color does not export any MPEG 2 Long GOP formats. I was shown that there are four RGB render options: Uncompressed 8 bit, uncompressed 10 bit, ProRes 422, and ProRes 422HQ.
After rendering, the sequence is sent back to FCP and is opened as a new sequence in the project. It is important to note that clips in this new sequence now reference new source clips or render files from Color. In addition, all handles are removed making it impossible to increase the clip duration in the timeline. All other effects, transition and operations done in FCP remain unchanged and can be modified as needed in the new sequence. Given this workflow, one must really consider Color as the final ‘finishing’ step in the editing workflow. If you do need to increase clip duration or add clips to the new sequence, you are ok still. You send the modified sequence to Color, it updates the project XML and tells you what clips need rendering. You then only need to apply your color correction to the modified clips, re-render just those clips and resend the sequence back to FCP.
Key aspects of Color follow:
Primary color correction – Users can start with auto balance and then use a 4 channel curve editor to get precisely the look and feel desired. This can then be copy/pasted to other clips in the sequence. A reference still frame option allows users to set up reference image to grade each video clip against. 3D scopes provide for real-time preview and adjustments.
Secondary color correction – Up to 8 secondary selections per shot allow users to refine each shot. One can easily create keys on all channels, use tracking mattes, apply vignettes, and various other tasks.
Color FX – Much like Shake, Color provides a node based effects view to build, manage and even save out as pre-sets node sets. These pre-sets can then be applied later to other clips or sequences.
Render Queue – Render options include uncompressed HD (10 bit and 8 bit) and ProRes 422 standard and HQ.
Color, ProRes 422 and FCP workflow consideration
Many underwater shooters use Sony HDV cams because they are most widely supported and reasonably priced HD camcorders. Underwater footage tends to require a lot of color correction work to get that professional look. Because of the lossy nature of HDV (MPEG 2), color correction on native HDV files often results in color banding and unwanted artifacts. As such, many people choose to up-convert to more robust intermediary frame based codecs with higher bit rates. Some go as far as to edit in uncompressed. Both options require much more hard drive space and place heavy loads on the processor to move all that data.
None of these options actually improve the quality of the source footage however. As a result, one must needlessly create much larger source video files or ‘Master Clips’ to accommodate color correction and effects handling, all to avoid the lossy nature of the MPEG codec. These must then be rendered again when exported from FCP. So, your primary movie file is already 3rd generation (HDV, intermediary, render format) before you encode to other delivery platforms.
An interesting HDV workflow emerges with FCS 2 which may allow for faster and lower cost video capture, much less hard drive space required, vastly improved quality and shorter editing cycles. Replace “HDV” below with your cams native format such as DVCPRO HD. The workflow follows like this:
1. Capture as native HDV
- No encoding, smaller files, no need for expensive capture cards
- Minimal rendering, native format
- 4:4:4 chroma sampling, 32-bit float workspace, reference to source clips by default
- Pixel by pixel up-conversion with 4:4:4 chroma sampling (apparently better than FCP up-conversion)
- Color render files created only for clips used in sequence and only between each in/out point
- Minimal addition rendering, high quality movie archive format at 1/6th size of uncompressed
- Single archive file used as high quality source for each target platform
This workflow back-ends the heavy processing and results in the lowest storage requirements for a high quality output solution. It also results in the least amount of encoding generations. It also does not require expensive capture cards. I ran this workflow by the Apple engineers and product designers. They agreed that no benefit is gained by up-converting files if one is using a ProRes 422 codec and Color for grading. In fact they suggested that Color will do a higher quality job of up-converting then the rest of the FCS applications.
-Shawn Heinrichs