Review: Nauticam NA-600D
When I was asked if would submit a review and evaluation of the new Nauticam Canon 600D housing, I accepted willingly. One of the major perks of my job is trying out new kit and so I was keen to see how Nauticam would design a housing for Canon’s entry level DSLR. I had previously tried out a NA-D7000 housing, and liked it very much. Nauticam has become a major force in the industry, and enjoy a reputation for bringing their housings to market remarkably quickly.
In general, SLR sales have taken a bit of a battering over the last few years as most of the major manufacturers lose new customers to the fast-growing CSC and EVIL camera offerings out there. Tiny form factor, but large sensored cameras have made an impression on traveling underwater photographers, affected by draconian baggage allowances. So, on unboxing the NA-600D, I was pleasantly surprised about how small it was. It follows every curve of the camera with very little wasted internal space. This made me think that perhaps there is still some mileage in the traditional SLR market yet.
I was initially impressed with the engineering skill shown in this housing.
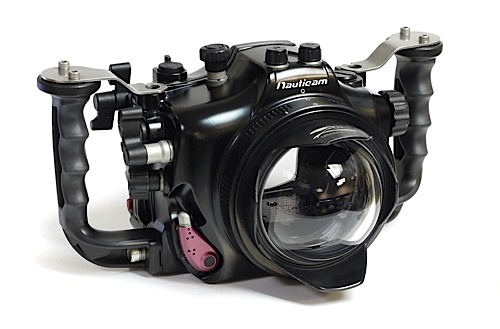
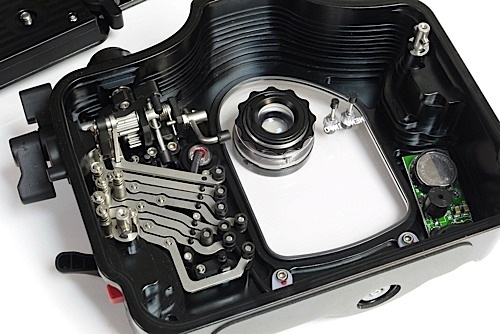
The housing back removes with a couple of positive two-stage locked latches. On removing the back, the rear half of the housing is an elegant series of metal precision-cut control actuators, which look like they have been cut from a single piece of stainless steel.
It would have been simpler to place the housing’s buttons at exactly the corresponding place to those on the camera, but this would compromise the ergonoimics of the rear controls. The levers and buttons on the right hand side are very easy to reach. I have quite large hands so most housings are, in this respect, fairly straightforward for me to use, but being a small housing anyway I think most folk would find it easy to navigate around these controls.
The camera sits on a tray which has the standard attachment tripod screw, aided in its placement by a locating pin which prevents any twisting of the camera if correctly seated. This tray is then locked with a lever to the right hand side of the tray. This is a stable, secure and well-proven arrangement. As is normal before placing the rear half of the housing, I checked to see if there were any issues with the on/off control and also whether the mode control dial and shutter release were all aligned. I noticed that the on/off switch on the front half of the housing was not working. However, upon closer inspection, I realised that the on/off control is actually in two halves and only meet when the housing is closed. This meakes them very difficult to misalign. To the right of the main power switch is a rather fancy looking control with a thumb lever at 12 o’clock and an opposing one at 6 o’clock. The top lever is to control the live view and video switch, and the bottom to access exposure lock and the magnify button, so you can check if you have that sharp focus.
Nauticam usually have comfortable handles and these are no exception, and whilst gripping the right handle it is easy to access these levers. Using your thumb for the rearward controls and your index or middle finger to access the forward ones. I am a particularly unforgiving critic in this respect, as I am missing my right index finger! I had no issues using my middle finger to reach any of the controls on this side. You will find yourself using either of these two digits quite frequently, as the bottom tier of Canon DSLR’s have only the one control input wheel, in the usual position next to the shutter release. This of course means that it has to double up as the wheel to input both your shutter speeds and apertures. Every base-level Canon for the last five years has worked like this. So in order to input aperture or shutter values, you need to press and hold down the exposure compensation button, which is normally to the top right of the LCD screen and this is arguably a little fiddly on land, even though the button is normally just under your thumb.
However, Nauticam have obviously realised that this would be even more awkward to do underwater, so they have re-positioned the lever to fall under the natural resting position of your right middle/index finger. Switching it forwards and backwards serves the dual purpose of holding it down for you as well, and with the big bold LCD display of the 600D its very easy to see your selection without even putting your eye to the finder. This makes the camera easier to use in its housing than it would be out of its housing and it should be a doddle even with gloves on.
Let’s turn our gaze towards the lens ports now. I was given a choice of ports for the Tokina 10-17 fisheye, which has almost become the de-facto standard super wide lens for underwater photographers. I opted for the very tiny Zen dome in a Nauticam fitting, as its size and form factor made it the only choice on what was becoming a very baggage sensitive excursion. I would have liked to have had the luxury of giving the big Nauticam White Balance dome a go, but space just wouldn’t allow.
Attaching and detaching ports is easy. All you need to do is line up the port with the housing, using a couple of very visible circles. You then push the port in, and then flick a two-stage lever. The two-stage action prevents you inadvertently detaching it, once secured.
You can easily change lenses and ports without removing the camera from the housing, as there is a lens release button on the housing as well.
As the camera has an onboard flash, strobe control is by utilising an optically triggered system, with two ports on the top of the housing to attach your fibre optic cable. I was using a single Inon Z240 most of the time using the very simple to use Inon sTTL system. If you forget to pop up the flash prior to putting the camera in the housing, it’s no problem with the 600D as all you need to do is place the camera into one of the fully auto modes and the camera will pop up the flash for you. Once up it can be disabled very easily too by a simple menu-driven command. This allows a switch to available light shooting if required.
There is little clutter on the left of the housing and the main control is the zoom or focussing knob, easily within reach of your left hand.
Ok thats the layout and controls described, but what was isit like to use?
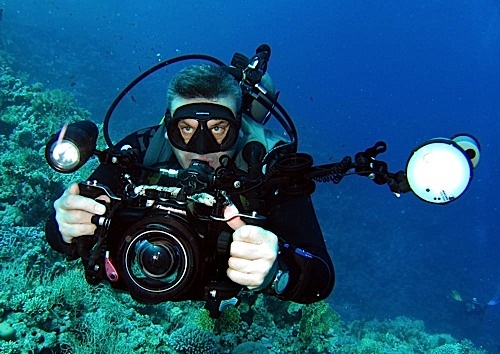
I found that it is easy to use, and quick to get used to. It is negative in the water (at least with the port system I was using anyway), and how much you will tolerate before resorting to buoyancy floats or arms is up to you. I had neither and didn’t find it unnecessarily heavy underwater.
As I tend to use a lot of different camera and housing combinations, I can be confused confusion at times, since even within a particular brand the menu structure and control functions of individual cameras can differ widely. The upside to this is that I can often tell fairly quickly if a manufacturer has got it right: If I can intuitively work my way round a new and unfamiliar camera.
The 600D gave me no major headaches and I never once had to resort to the instruction book to carry out anything within the usual underwater photography parameters.
Within a dive or two I was quickly able to switch between shooting strobe or available light and make any corrective exposure changes as was necessary, in a quick and fuss-free manner. Custom white balance is a little more complex to set than on most compact cameras, as you have to shoot a reference frame to enable the camera to base its calculations upon first. When shooting RAW this is only for reassurance reasons, as colour temperature discrepancies can be corrected very easily post dive. It is worth getting to grips with this function though as it’s pretty vital for shooting video.
As a video camera I couldn’t give it a thorough workout as on the very last day of the trip I managed to strip the main control dial, dohh! I had chosen this particular day as my video test, as I had asked for us to dive the Aquarium dive site, Hurghada, as there are a couple of schools of baby Barracudas and Goatfish which lend themselves perfectly to the moving picture. I managed a couple of shots but the camera was rendered incapable by my clumsiness with the control wheel. I can however say that even the task intensive nature of shooting video with an SLR, is a fairly straightforward feature to access on the 600D, and is simpler to do than on a 5Dmk2 or 7D. So for those who you who wish to shoot primarily video or video and stills, and would like a setup that is comparatively easy to use, then it is worth giving this little system your attention.
If I have a criticism it would be that the engineering is so precise and complex on the housing that I worried that this could be an Achilles heel. A bit like having a finely tuned but niggly sportscar, or a thoroughbred race horse always under the vet. I voiced my concerns with the UK Nauticam importer and he was quick to allay my fears. After an extended period of use the housing can be returned to Nauticam for a full service, during which all o rings are replaced and any worn parts replaced. I don’t think that this is too unreasonable, if you want to keep the housing in tip-top condition.The benefits of the precision and complexity are reflected in the ergonomics of the control layout. This was one of the best housings that I have ever used.
The Nauticam 600D Housing was loaned to the reviewer by Underwater Visions for the purposes of this review.
About the author: Paul “Duxy” Duxfield works for Ocean Leisure Cameras, and conducts a number of overseas trips and workshops every year teaching people the fundamentals of underwater photography and video. He has worked for OLC since their formation less than a year ago. Prior to that he has worked in the underwater photographic trade, since his return from Egypt in 2003 where he worked as a Dive Guide and Videographer for five years. He has written a series of beginners articles for DIVE and is currently writing for Sport Diver. He is a regular speaker at the annual Diveshows, and does talks the length and breadth of the UK to any dive club that will have him!