Seacam Prelude for the Canon 60D review
As good as the housing felt, the most important question in my mind was whether the camera suffered with just the Q and QR buttons to change settings? The answer for stills is yes, but with caveats.
Generally, many photographers are trained to shoot in manual, with full control of ISO, Shutter and Aperture. With the 60D, Seacam decided to shift towards using the screen menus. The Quick Control Screen Menu has every essential control in it, from AF mode and point selection to metering mode and white balance. I’ve often used the QCS on the 5D2 and 1D4. It’s an easy way to go into select functions quickly in the age of drop down menus. For those accustomed to other ways of working, it may sound complicated and alien, but it’s actually very easy to adapt and get accustomed to it.
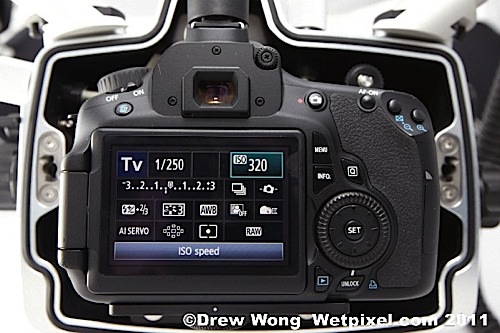
Here is the QCS menu on the 60D. This is THE menu to know.
Accessing ISO is as simple as leaving the QCS cursor on ISO, then leave the menu. Then whenever one needs to change ISO, it’s right there with one button press. I worked like this pretty much all the time and it worked pretty well. And one doesn’t need to look at the LCD monitor either. With the S10 giving the user the full view of the camera’s viewfinder, one can cycle through the QCS menu and wait for the corresponding window on the QCS to light up in the viewfinder information screen. FEC, AF points,EC and other information are all available on the information screen and will only light up when selected.
Shooting in manual mode for both strobe and camera, I felt I had all the control I needed over camera exposure. Shutter and aperture were directly controlled and ISO was a button push away (provided I kept the Q cursor on ISO). This made shooting wide angle very easy.
Once I required control of the strobe lighting in ETTL Flash Exposure Compensation (FEC) on the Seaflash strobes, things got a bit more complicated. The QR control only cycles the menu to the right, so from ISO to FEC, there are 4 presses to adjust FEC settings, then it’s another 10 presses to cycle back to ISO. This was where I got frustrated in fast action. Even when I had time with subjects that didn’t move as much, it became almost tedious on the occasions I had to do so.
This issue was the same for any other function on on the Quick Control menu. There’s only one direction to cycle through the menu. If I wanted to have all exposure control at my finger tips, I had to make sure the cursor is back at ISO once I change the function I needed, be it FEC, AF point selection or AF drive mode. And that meant multiple presses.

Here is a test of how powerful the Seaflash 150 are. Note how even the spread of light is.
1/100 f10 ISO320 FEC -1/3 ETTL Tokina 10-17 at 10mm.
However, the truth is I didn’t need to change settings that often. Mostly, the reason I changed often was because of this review. I had to go through all the AF and metering modes, as well as use the Seaflash 150 in ETTL mode underwater. Otherwise I wouldn’t change those settings so often at all.
I couldn’t chimp to check focus or exposure, since with the 60D, access to the INFO button is required to scroll through to the histogram menu, but the 60D defaults to the picture only. Fortunately, there’s a work around for that, by turning on shot review. That allows for RGB histograms etc to be displayed. That eats into the battery a little bit but it works. The Magnified View requires access to the -/+ buttons and at least up/down/left/right in Quick Control Dial. And those aren’t on the housing either.
How the camera performed at wide angle:
Tokina 10-17mm
Now that the housing has been explored, we must now talk about how the 60D handled wide angle. Coming from 35mm and APS-H sensors (5D2 and 1D series) and only sporadically shooting with APS-C, I was pretty eager to see how the “lower end” 60D held up.
The 60D has a 9 X-type point AF system with the high precision f2.8 X-type at the center point. This is actually a step up from the 5D2’s single X-type and it showed in the Bali test. Using Auto Selection in Ai Focus AF mode for wide angle, the system would get fooled by a fish swimming into the foreground only occasionally.

Soft coral at Liberty wreck. 1/80 f11 ISO400 FEC -1/3 ETTL. Tokina 10-17 at 10mm.
It wasn’t flawless though. I did have issues with focusing on cormorants in not so clean 8m viz. Turbidity kills contrast and the 60D did have problems hunting a bit with the Tokina 10-17. Only when I switched to the f2.8 of the 10-22 did it perform better using the center AF point. Like all Canon AF system, an f2.8 lens using the high precision X-type AF point gives the best performance in accuracy. I felt the 60D was slower to focus in than the 5D2 using center AF point. When I moved to AI Focus AF mode, it felt faster in achieving focus, but got fooled by other fish movement with the AF area, causing it to chase a bit, especially in lower contrast subjects.
With the 10-17 and higher contrast, the AF followed subjects like the famous schooling trevallies of the Liberty wreck with few problems, only hunting on a few occasions with those surgeon and damsel fish would jump in front of the lens. Still I soon stuck with the center AF point and AI Servo mode. While AI Focus mode worked probably as well with wide angle, the turbidity of the water did cause just a few more focus jumps and thus AI Servo was most reliable for wide angle.

The famous school of Trevally. 1/125 f9 ISO400 FEC 0 ETTL. Tokina 10-17 at 10mm.
The 60D’s metering system does a good job at measuring exposure for ETTL with the Seaflash (I’ll talk more about the Seaflash 150 in a separate review). Basically it controls the exposure well on the AF spot chosen, which was the center one. In evaluative mode, it didn’t blow out the highlights of silver fish in the picture below. Even when I tried to trick it by metering for open water in a shadow environment, the exposure came out pretty well. The only problem was the ETTL cannot control the power from each strobe. Thus if one strobe is closer to subject than the other, you get overexposure. This is an issue that will be discussed in the Seaflash 150 review.
More importantly, when I started using the semi-automatic modes like Tv and Av, the metering system did a pretty good job of exposure. For shots like sunballs, I locked shutter speed at 1/250 and ISO at 100 or 200. Then I let the camera decide how to play it. As the picture below shows, it actually does a very decent job of exposure.

Shot in Tv 1/250 and ISO200. The 60D choose f10 (Spot metering on the wreck portion of the picture. The result was shockingly decent, at least for a manual luddite like myself.
Sigma 8-16.
I’m a big fan of the rectilinear look. I think the distortion of a rectilinear lens is a better looking than the curvy barrel look of a fisheye. One of my favorite lens is the Sigma 12-24, known as the Popeye. At 12mm, it covers 122° diagonally and is a popular architecture lens.
I had the intention to test the Sigma 8-16 but Seacam did not have a zoom gear for it and I only had 2 extension rings with the Superdome. It was not optimized and I had no time to test. So I just left it at 8mm and went out on the wreck for a quick afternoon dive, using just the 35mm extension ring, which was a bit short. I stayed with natural-like wreck shots to demonstrate what straight-line 12mm (35mm) look like. The corners aren’t nearly good enough because of the lack of the right extension to get the optimized placement. It does show off the 8mm side of the lens, how sharp it is and even how well it performs in sub-optimal conditions.

Liberty Wreck 1/60 f13 ISO320 Sigma 8-16 @ 8mm

Liberty Wreck 1/50 f10 ISO200 Sigma 8-16 @ 8mm

Here you can see the corner performance at 100%. It’s pretty darn good!
As you can see, it’s a very nice and sharp lens. With a bit of experimentation with extension rings to optimize it for the dome port, it should be a excellent rectilinear lens for the APS-C cameras. I also think it’ll finally push APS-C housings to use 9”+ dome ports for best performance, some thing 35mm shooters have suffered ever with 16mm lenses.
Auto Shooting Modes.
I’d be remiss in my duty as a reviewer if I didn’t try a few of the 60D’s program modes. I’d remembered in my interview with Harald about Kurt Amsler’s article on the D7000 and how the program modes worked well. So I had to try out CA (Creative Auto), Macro and Full Auto mode at least. Macro mode is talked about on the next page. I just did a cursory test without caring about composition. I just took snap shots in the last 5 minutes of my dive in the shallows to see how viable the 60D is as a real beginner’s camera in auto mode.
Full Auto.
Full Auto Mode decides everything from AF mode and metering mode to ISO setting. It only does Single Shot. I was a little surprised by it because it did a decent job of shooting. If the camera detects a strobe, it will fire the strobe. I guess it’s not auto artistic. Exposure was good and every shot was at ISO400, which I assume is like the Av mode where it’s stuck at ISO400 when a strobe is detected. According to the manual, it will go between ISO100-400 if FEC cannot prevent overexposure in ETTL mode.

This photo in Full Auto Mode surprised me. The exposure was on the trevally obviously as they aren’t blown out. Full Auto Mode. 1/250 f10 ISO400. Tokina 10-17@10mm ETTL
So while I personally wouldn’t shoot in Full Auto Mode, it does give decent enough results where, with RAW post-processing, it can save an image to get a decent picture.
Creative Auto Mode.
Creative Auto (CA) is an auto mode asks you what you’d like to do. It allows you to choose how much one wants the background blur, ambience (which is just a programmed look) and also style. My test with Creative Auto was pretty limited since I couldn’t access the controls to fine tune the Creative program due to the lack of controls on the housing. If a beginner were using this camera with this housing, I think this mode would be a progression from Full Auto Mode though, so I tried it with standard settings. I couldn’t preset because once you change modes, it resets to default.
The CA mode in standard worked like Full Auto. The image it took with a backlight sun was actually pretty good. It was underexposed by probably 1 stop but well within saving in RAW mode. Like Full Auto, it will fire the strobes when detected, regardless of whether it’s needed. I’m assuming it detected subject movement and chose a higher shutter speed. Both modes tend to keep ISO at 400 and adjusts shutter and aperture to suit but will drop between ISO100-400 when needed to control flash overexposure. The Canon ETTL system works with silver fish evidently, because to meters to grey 18%.

A pleasant surprise. CA mode is ‘almost’ a natural underwater shooter. About a stop underexposed by it took into consideration of the backlighting and subjects and shot this at 1/200 f11 ISO400. FEC -1 ETTL II Tokina 10-17 @ 10mm

My settings for the sameish scene. Not that far off! 1/250 f10 ISO 200. FEC -2/3 ETTL II Tokina 10-17 @ 10mm
If a program mode can get within 1.5 stops of my preferences, I’d say that’s pretty darn good considering that it’s a $1000 camera. I do very much regret not testing the camera in this mode more. It was the 2nd last dive of my trip. I wish I had checked my pics sooner instead of getting the camera ready for the next dive.
The S10 Sportsfinder took a bit more adjustment for me. It gave the same excellent 3X 100% view of the camera’s viewfinder. However, the 10° tilt was just enough for me to have to hunt a bit if I didn’t want to press my mask against the viewfinder. I was too accustomed to a straight viewfinder.
The S10 also made shooting vertical/portrait style a bit different. With the S180, I could keep my head in the same position. With the S10, I needed to either turn the viewfinder 90° for verticals or shift my head to see through it. That adjustment took me about 15-20 dives to make, and it still wasn’t reflex.
Next up… Macro!