Sealux HX7 underwater housing for Sony HDR-FX7 review
This is my first review for an underwater housing, and I am not an English native speaker, so please forgive my weaknesses in explanation. I would like to introduce a leading Germany housing company called Sealux, and my review of their HX7 underwater housing for the Sony HDR-FX7 video camera.
Sealux - The Company
Due to the fact that Sealux is not very present out of Europe here is a brief introduction of the company. Milan Czapay, an engineer from Slovakia, very experienced diver and photographer for many years, took over the already existing company Sealux in 1990. After his relocation to Germany in the seventies, he had already begun to build underwater housings as a hobby. Milan won many underwater photo competitions over the decades. Two times in a row Sealux was awarded as the best producer of underwater housings in Germany from a leading dive magazine. In January 2008 he retired and his former employees Jürgen Ostertag and Arno Thiel took over the business; Milan is still working as a consultant.
The company offers still and video housings for the leading cameras on the market. For still cameras many ports are available. Additionally, they are partly compatible with Fathom or Century ports. The universal housings for small video cameras are also available.
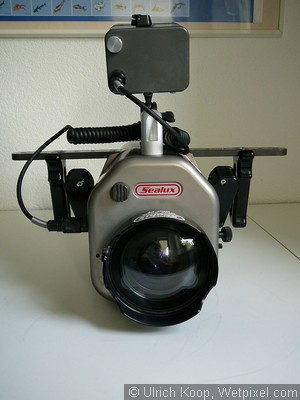
The HX7 Housing
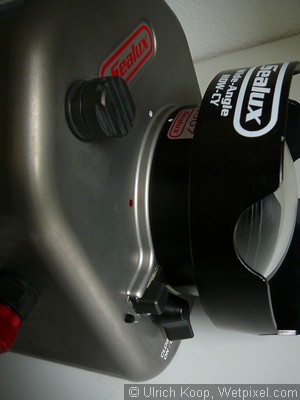
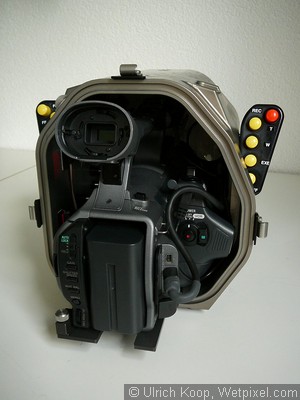
The HX7 housing is made of machined marine grade hard anodized aluminum. The color looks a little bit golden but is called “titanium silver.” The housing is quite small and measures with flat port 333 mm (length), 179 mm (width, 2400 mm with the keypads) and 190 mm height. There are three ports available:
- flat port
- zoomable high grade wide-angle lens (90°)
- fisheye lens
The housing weighs 5950g up to 7500 g depended of the attached accessories. The buoyancy is 694 g, or a little bit more in salt water with the 90° wide-angle lens.
The housing is sealed with one o-ring and closed with three latches. The latches are secured against accidental opening. The ports are attached with a bayonet. The bayonet also has a fastening bolt and one o-ring to seal it.
The housing doesn’t have a plastic window: the diver has to look through the viewfinders which consist of real lenses. I have the long-distance video viewfinder with a 6x enlargement attached. The long distance viewfinder (15° inclined) makes it possible to keep a max. 15 cm distance from it with the eye. So it is possible to film and watch the show at the same time.
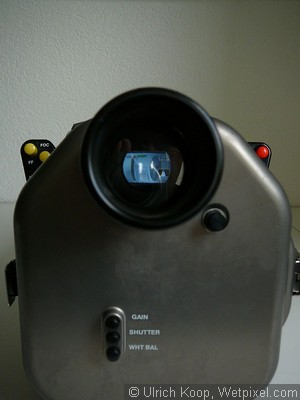
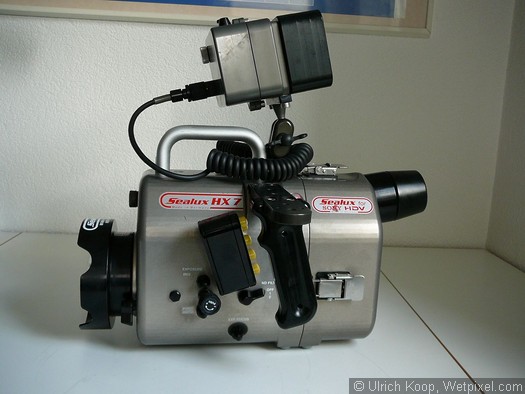
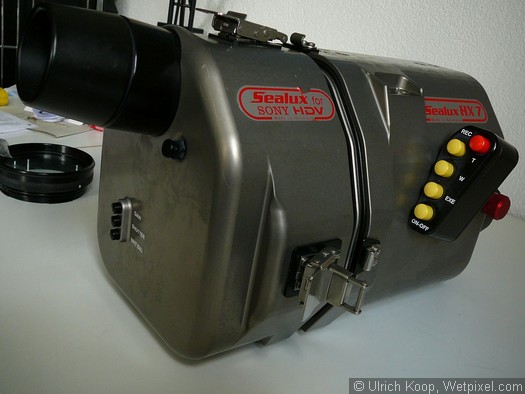
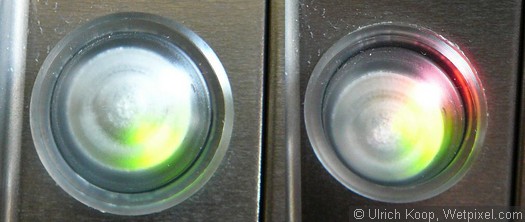
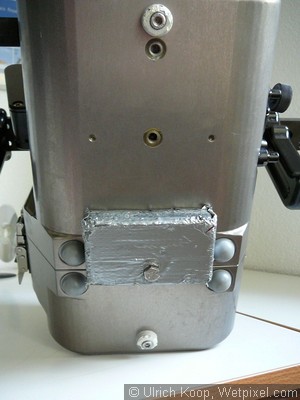
At the front of the housing there is an underwater microphone and at the right side are located the connectors for the external screen. There are 13 threaded mounts made of stainless seawater proof steel available. The threaded mounts are adhered to the housings with epoxy. Two of them are used for the mounting of metal pieces which are used as “a victim anode” against corrosion. The rest of the mounts are available for handles, weights, monitor and other stuff. On the upper-left side the housing has a transparent plastic cap. The green LED light under it indicates if the camcorder is turned on or off, while the red LED indicates if the cam is recording. If there is a blinking green LED, you’ve forgotten the tape.
I bought the 90° lens, the flat port, the external 3.6“ 16:9 monitor, an arm for the lamp and the long distance viewfinder as additional accessories. I tried to bring Fathom and Sealux together but it didn’t happen in time. Now, they will work together for the EX-1. So, keep an eye on this.
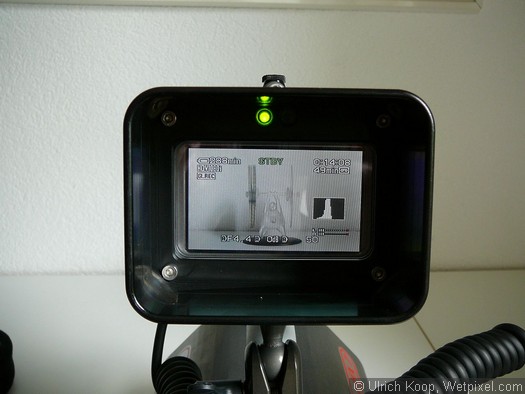
For additional parts, check out the Sealux website. The port mount is made of aluminum as well but anodized with a black finish and two glass lenses. The 16:9 monitor is also made of machined marine grade hard anodized aluminum. The color is also “titanium silver.” It has a plastic sunshade to improve the visibility during strong sunlight. It only can be turned on and off, there is no further adaption possible. Behind the double-folded silver cap is the plug for the charger. It needs 3 hours to be fully charged and lasts for four hours.
Inside the housing, two moisture sensors are placed in the back and the middle of the housing. The small batteries are glued to the walls with double-sided adhesive tape. All cables are also connected to the wall with holders. All together it looks quite tidy in the housing.
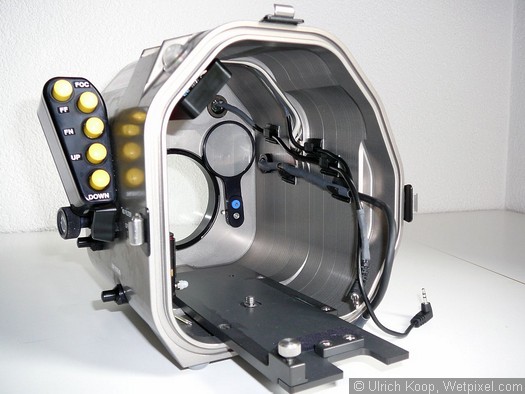
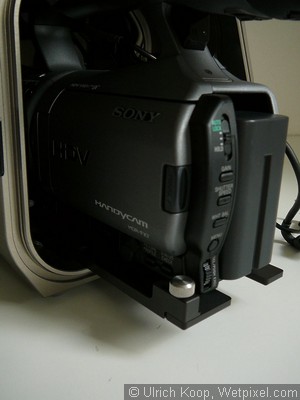
The camera is placed on a removable base plate. This plate is mounted via two tracks and fixed with a screw. The camera is mounted with a common screw and the stop position is set with a small metal attachment under the battery. The small circuit board is covered with a plastic casing and can be found close to the top of the housing.
The o-ring has to be lubricated and lies in a well dimensioned cut-out and can be removed easily. The housing color makes it very easy to look for dirt and particles in the cut-out.
The Controls
The housing has a mixture of mechanical and electronic controls:
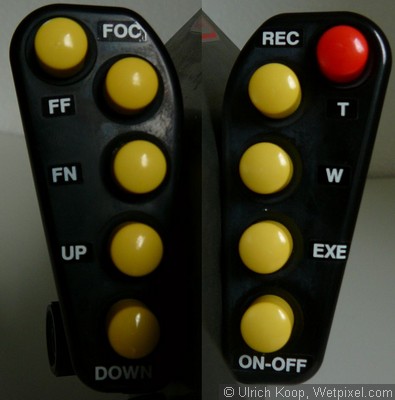
A. Electronic magnetic controls
On both sides there are two little keypads attached to the housing. These pads offer the following controls on the left side:
- autofocus on – off
- focus far
- focus near
- up (cursor)
- down (cursor)
and on the right side:
- record
- zoom near
- zoom far
- execute
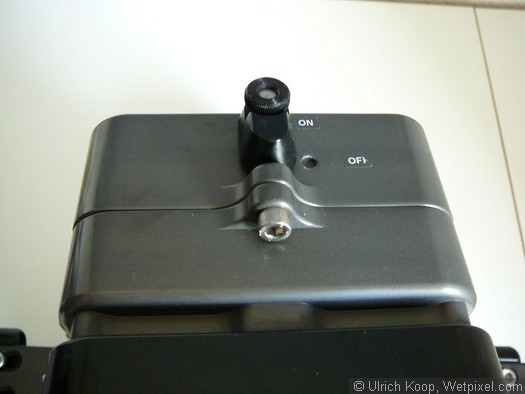
- on – off
B. Mechanical controls
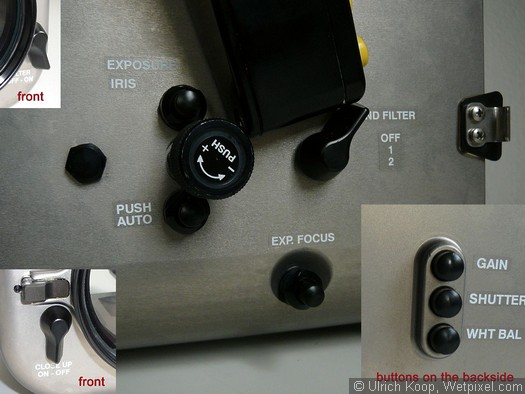
The housing offers two types of mechanical controls – rotary knobs and buttons. The buttons are sealed fourfold and the shafts of the knobs twofold. The following buttons are available:
- gain
- shutter
- white balance
- expanded focus
- push autofocus
- exposure/iris
and the rotary knobs which can be used are:
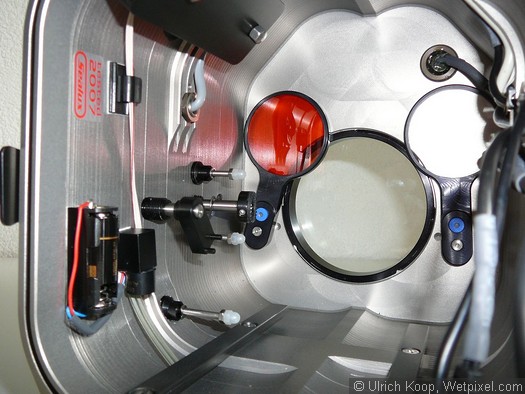
- flip filter (red)
- flip close-up lens
- front wheel
- ND filter
The flip filters snap in their end positions with an audible “click.”
Setting up the housing
This is the way I normally set up my housing. First of all, connect the handles and position the grips as you desire. To mount the wide-angle lens, the fastening bolt has to be opened. The o-ring needs to be lubricated with grease for smooth screwing. Simply bring the marks together, push the port into the bayonet and screw it to the next mark. Close the fastening bolt.
Then, the camera has to be mounted on the base plate. Of course, the camera doesn’t have the protected cap attached. Also, the original view finder and the hand strap have to be taken off. This is the disadvantage of the very compact housing. Before inserting the camera, the rotary knobs for the wheel and the ND filter should be pulled to the outside. Then insert the camera halfway into the housing and attach the microphone cable.
At the end position, fix the plate with the screw. All screws can’t fall off, they are secured. The two knobs have to be pushed back to the inside and the two remaining cables for the LCD screen and the controls have to be plugged.
Now is a good time for the final inspection of the cut-out, I am doing this with a small LED lamp. Put the o-ring into the cut-out. The versatile part where the original viewfinder was attached has to be positioned a few degrees upwards. There is also a little tool for this. Finally, close the housing. The positioning of the two halves is simple because the whole inner side of the cut-out has an edge so you can’t close it incorrectly. Close the latches and you are done. NP-F770 is the biggest battery which fits (the 970 version is too big).
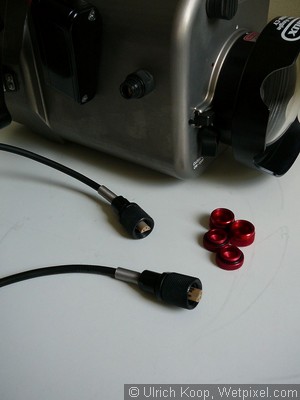
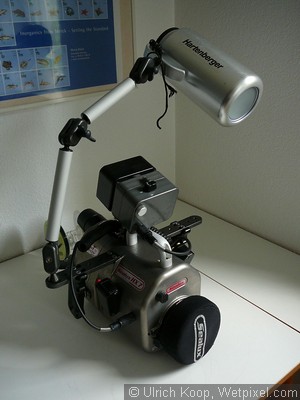
Mount the monitor, lights and weights as shown in the pictures. This is a standard for all the housings that I know of. The cable connectors have two o-rings and can be attached very easily. Here is picture of my full setup. The Hartenberger lamp is absolutely neutral in salt water (HID) and can be used as a hand lamp and video light.
Diving
I bought the housing for an exclusive four-week rebreather trip to Malpelo on the Inula last year. There I proposed to my girlfriend Kathrin underwater. I used it on many dives at Malpelo and later in the year in Thailand under challenging conditions. The transport happened in my backpack because of the compact size.
You can’t really jump with the housing if the monitor is attached but the roll out of the dingy is no problem. The hand grip is a very good thing to have for transportation purposes. I never tried the housing without the external monitor. The monitor should be mounted in the middle. Once mounted on the handles, it always tilts underwater to the side. With the monitor, the housing can flip completely, forced by the positive buoyancy. I took a normal weight and cut one-third off, drilled a hole in it, and mounted it under the housing (slightly to the back) with a screw. The result was quite good and the housing was slightly negative and very easy to move. It seems to me that this solution is not required if a Sealux light system is mounted underneath the housing. The neoprene cap is good protection for the lens. You don’t lose it in the water and it can be removed easily.
I enjoyed filming with the housing and the camera. The controls did a very good job. I used manual white balance with two set presets very often and the manual focus. Most situations can be filmed with 0.7 m for the focus. The white balance should be done through the viewfinder because the colors of the LCD and the viewfinder don’t match. but with strong sunlight the viewfinder is the better solution. I am hoping that there will be OLED screens available very soon. This could solve this inherent LCD problem.
The wide-angle lenses may cause some reflections if there is a need to film against the sunlight. But I think this a normal thing and it is dependent on the angle where the light comes from. The wide angle itself is sharp from edge to edge and partly zoomable, virtually no vignetting visible. By zooming in there is loss of sharpness at the outer areas visible.The screen can be switched on and off separately and lasts four hours with four AA batteries.
There were two weaknesses I had to solve after the trip. The double-sided adhesive tape inside the housing gets loose because of the usage. Not a big deal. On the first trip, I found a dark corner on the footage wasn’t visible on the LCD screen and the viewfinder. I sent the housing back to Sealux to fix this. One reason for this was my camera, which is apparently slightly different than the one Sealux has. Nevertheless, the screw for mounting the camera on the plate could be improved. If the screw is not tightened completely it is possible to move the camera about 2 mm at the front. This can be solved by using a smaller hole for the screw like Gates has. For the new EX-1 housing there is already a better solution.
After the dive a freshwater rinse is mandatory. The surface looks a little bit blotchy after a while. This is apparently normal behavior. Sealux provides the housing with a spare o-ring and a natural oil. After 10 dives it is good idea to rub the housing with this oil. It is little bit like skin care ;-).
Personal comment – pros and cons
Before this housing, I had NIMAR, Gates and Fradotec (former Mediasub/Bruder). The NIMAR housing was broken after 10 dives. I gave it back and got the Gates for the Sony PC330 with a Fathom port. It was a good housing, but I had some corrosion issues at the screws of the latches and a flooded camera. I forgot to clean the cut-out from time to time, and I felt the controls weren’t precise enough. Then I had Fradotec twice, which was previously Mediasub/Bruder. The second housing was a mess. I am still missing the money and the housing and had further cost for courts and lawyers. I am reporting an offense to the police against them now. So, from my point of view I can’t really recommend this company.
After all this, I found Sealux with the HX7. I have a very friendly and supporting relationship with the company, and the housing fits my style perfectly. The only bothersome thing was the positioning of the camera. Fortunately, this problem is solved now and that there wasn’t even a discussion about this with Sealux. Of course, they fixed it for free. Their housing prices can be seen on their website, and from my point of view they are fair; it was cheaper to buy Sealux than buying a Gates, Amphibico or something else. I would recommend the housing without any restrictions. With a few small improvements it could be the perfect housing.
For an amateur like me, the combination HX7 housing with the Sony HDR-FX7 is the perfect solution for underwater video. The FX7 did a very good job. The low-light abilities are better than I thought. I compared the HC7 (2 Lux) and the FX7 (4 Lux). I don’t know why Sony publishes numbers like this. Practically the FX7 performs much better at low light. Malpelo had lot of rain and murky water, but the FX7 in the HX7 did a great job. The HC7 simply failed completely, went crazy with the white balance, or provided a very noisy picture.
Here is my summary for the housing:
Positives
- Many controls available, good mixture of mechanical and electronic controls
- Multiple port configurations from macro to fisheye
- Very precise manual controls with multifold sealing
- Compact design, suitable for hand luggage
- Very reliable and easy-to-use
- Good support
- External monitor with good sunshade and battery indicator
- Long distance viewfinder
- Very good cable connectors sealed with two o-rings
Neutrals (possible improvements from my point of view)
- Buoyancy with external monitor, a weight system would be an improvement
- External monitor has four hours battery life, could be much more
- Lubricated main o-ring, a trap for particles and fuzz
- Maximum NP-F770, but NP-F970 is not a must
- No accessible controls to change picture of the LCD screen
- No buttons for menu and at least one preset, presets would be nice to have
- 120° Fathom port would be perfect
Negatives
- Positioning of the camera, the bore for the screw should be narrower in order to reduce the possible movement of the camera at the front
- Double sided adhesive tape falls off